Splunk, Auth0 and SAML SSO - part 1: IdP configuration
In order to remediate password fatigue problem, companies are implementing SSO solutions. This approach is not only beneficial for the user who can benefit by using single credentials for multiple applications but also significantly reduces administrative overhead (for instance, all the user privileges can be revoked just with a single click!).
In this short guide we are going to see how to integrate Splunk with and an Identity Provider (IdP) using SAML protocol. There are several big IAM companies which can act as an IdP, such as Okta, Ping Identity or Auth0. I am going to use Auth0. As of today, this integration is not in the official Splunk documentation. I was able to find one blog post that discusses this scenario, however it is dated 06/2019 and seems incomplete/truncated.
This post focuses on IAM part, while the next one examines Splunk configurations.
Glossary
ACS URL An Assertion Consumer Service URL is an endpoint that is going to process IdP response (SAML assertion)
IAM Identity & Access Management solutions are used to manage user identities and control access to the enterprise resources
IdP IAM subsystem responsible for identity; also often understood as the company that provides this function as a service
Principal A user or an application (service account) trying to authenticate.
SAML Security Assertion Markup Language is an open authentication exchange standard.
SAML assertion Information about the principal provided by IdP; also known as SAML response
SSO Single Sign-on; an authentication scheme that allows a user to log in with a single set of credentials to multiple applications/systems
Setting up Auth0 as IdP
Creating a new app
- From the main Auth0 dashboard select Applications and click Create Application button.
- Enter app name (such as "Splunk") and select Regular Web Applications as application type.
Configuring your app
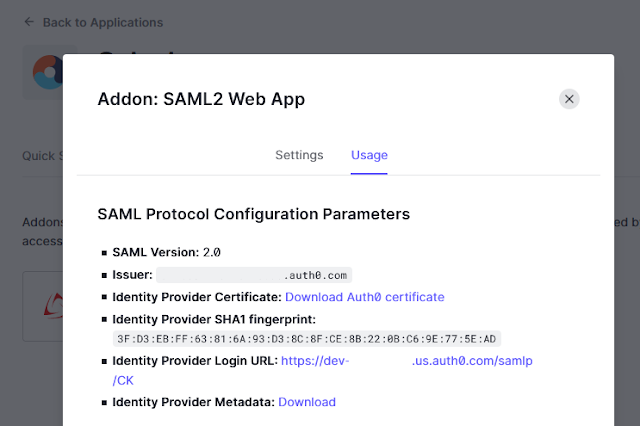
- Click on your new app to see the details. Go to Addons tab. There is SAML2 WEB APP addon available.
- Click to enable the addon and enter your ACS URL: https://your-splunk/saml/acs
- On Usage tab click Download to get the XML file with Identity Provider Metadata. We are going to use it later to configure Splunk.
- Don't forget to add your ACS URL to Allowed Callback URLs! This setting is present on Settings tab, under Application URIs section.
Creating users
Go to User Management and choose Users. Click Create User. Provide an e-mail address and a password. Note: this has to be a valid address, as you are going to get a verification e-mail.
Creating roles
Go to User Management and choose Roles. Click Create Role. You just need to provide name and description for the role. Any role name is fine, we are going to map these names to Splunk roles later.
Assigning roles to users
The last step of the user setup is to assign roles to users. This can be accomplished from User Management / Users dashboard. Use [...] button next to the user entry and select Assign roles from the menu.
Returning role list in SAML token
By default, Auth0 does not provide information about user roles in the SAML assertion, yet they are required by Splunk. Fortunately, there is an easy way to add it. As per this blog post, go to Auth Pipeline / Rules and click Create. Use the code below. It will add rolez attribute containing user roles. For more details check the original post.
function (user, context, callback) {
  // Get the user roles from the Authorization context
  const assignedRoles = (context.authorization || {}).roles;
  // Update the user object.
  user.rolez = assignedRoles;
  callback(null, user, context);
}
That's it! In the second part of this guide we are going to explore Splunk settings.


Comments
Post a Comment